We usually want to develop and deploy applications and work with the Raspberry Pi (RPi) from a laptop or desktop computer. Use an external keyboard and an extra monitor only when there is no network access to the device. Your computer and RPi is likely connected to the same office or home network by using LAN connections or a WiFi router. The best way is to assign an ip address to the RPi to make sure it’ll always have an ip address that we know to be able to use SSH, remote desktop and application deployment tools. We have two popular options.
1. Assign static ip address to Raspberry Pi
Open the Terminal on Raspberry Pi and configure the LAN (eth0) or WiFi (wlan0) adapter. The configuration file of /etc/network/interfaces contains all known network interfaces. Issue command $ sudo nano /etc/network/interfaces to open it:
Change iface eth0 inet dhcp into iface eth0 inet static. When you want to assign static address to the WiFi adapter too, change iface wlan0 inet dhcp into iface wlan0 inet static. Change or insert the netmask, gateway, network and broadcast data properly. Add these new lines to the file if necessary. You can mix static and DHCP settings: LAN has static address and WiFi has DHCP, or LAN interface gets ip address from the DHCP server and WiFi interface has static address, or both has DHCP or static address. Save changes and reboot.
If you want to set the address of 192.168.0.10 on your network of 192.168.0.x with a router address of 192.168.0.1 then configure the interface as followings:
iface lo inet loopback
# Ethernet interface uses static address: 192.168.0.10
iface eth0 inet static
address 192.168.0.10
netmask 255.255.255.0
gateway 192.168.0.1
network 192.168.0.0
broadcast 192.168.0.255
# ... rest of your file
In this example the WiFi interface is set to 192.168.0.11:
allow-hotplug wlan0
# WiFi interface uses static address: 192.168.0.11
iface wlan0 inet static
address 192.168.0.11
netmask 255.255.255.0
gateway 192.168.0.1
network 192.168.0.0
broadcast 192.168.0.255
# ... rest of your file
Note that you must properly set the ip address and the values of netmask, gateway, network and broadcast for your actual network configuration.
2. Reserve ip address for Raspberry Pi with DHCP
Office or home routers distribute ip addresses to machines requesting an ip address over DHCP. It’s highly recommended that choose this option when you have several other devices on your local network, or your Raspberry Pi is a ‘mobile’ computer. You only need to know the MAC address of interface eth0 and/or wlan0. This option offers a better way to setup your Raspberry Pi connections.
a.) Open the Terminal and get the MAC address of your eth0 and/or wlan0 interfaces:
$ ifconfig wlan0

Notice the HWaddr (MAC) values. You’ll need them at the DHCP configuration.
b.) Open the configuration file /etc/network/interfaces that contains all known network interfaces. Open the editor with command nano:
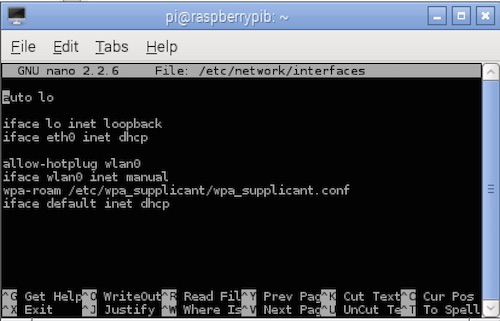
It has to contain ‘dhcp’ and should look like this if you have added a USB WiFi adapter:
iface lo inet loopback
iface eth0 inet dhcp
allow-hotplug wlan0
iface wlan0 inet manual
wpa-roam /etc/wpa_supplicant/wpa_supplicant.conf
iface default inet dhcp
If you want be sure what it is, open and check out the WiFi connection configuration file of /etc/wpa_supplicant/wpa_supplicant.conf as well.
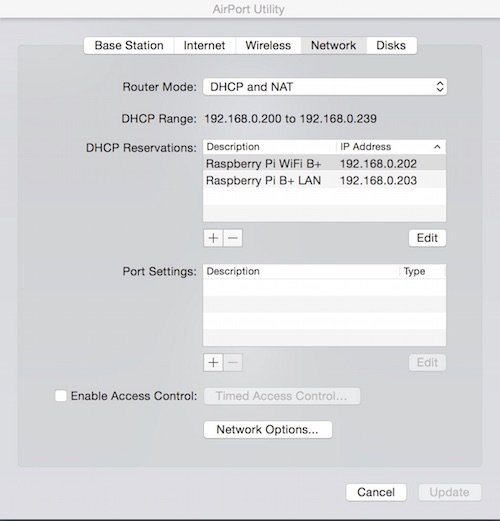
c.) Configure your DHCP server
Read the documentation of your WiFi router or DHCP server, or consult with your network administrator if you do not know how to setup a DHCP entry.
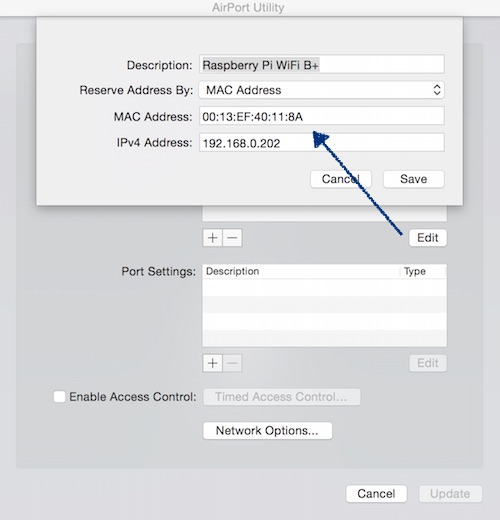
On a Mac, an AirPort WiFi router can be configured as: