Question
As a newbie I am planning to play with a Raspberry Pi 2 (RPi). I am a seasoned c++, c#, objective-c and java programmer. Can I manage projects from my MacBook Pro? Can I control RPi remotely from the Mac without using extra monitor and keyboard? What programming languages and SDK do you recommend? Can I use Xcode, Eclipse or NetBeans? How to debug and deploy a Raspberry Pi application?
Answer
Our short answer is yes, you can develop and test programs for Raspberry Pi-s with your Mac. Raspberry Pi 2 is built around a quad-core ARMv7 you are probably familiar with from your iOS projects. It has 1GB of RAM and a MicroSD card that can be used as system and data “drive”. An 8GB SD card is usually more than enough to run OS and custom applications. We prefer fast 32GB or 64GB SD cards for home automation and multimedia projects with larger local data files. USB hard disks or flash drives are usually not required. For OS, Raspbian – a Linux flavour, a version of Debian compiled for the Pi’s processor – is a good starting point. If you are familiar with Ubuntu or other OS-es, such as Microsoft Windows 10 (embedded), then feel free to install that one.
As you can imagine, several options such as operating systems, extensions, developer tools and programming languages are available. Choose your favorite one and build some Hello World ! apps, or a sophisticated media center or a home control unit around this strong little device.
Our recommended steps are based on Raspbian and RDP:
1. Visit Raspberry support web site to learn from others and download tools
Raspberry Pi Foundation web site
2. Check out your Raspberry Pi installation or prepare a new SD card
Probably you should start with NOOBS and Raspbian. Installation instructions are available here. If you are a Microsoft guy then you may need Windows 10.
When you prepare a new SD card, format it with FAT32 on your Mac/PC. Drag all the downloaded files in the extracted NOOBS folder and drop them into the SD card’s root folder. Remove the SD card and insert it into your RPi.
For the first installation and configuration steps, connect a monitor with HDMI cable and a USB keyboard+mouse combo to the RPi. Plug in its USB WiFi adapter and power supply. Your RPi will boot and a window will appear with a list of installation options.
Connect your Raspberry Pi to your local network and/or WiFi router. Internet access is sooner than later will be required. Use USB WiFi adapter or a LAN cable. Set its static IP address or configure the DHCP server of your network to let you find the RPi easily. Instructions are available here.
Do not forget your pi password. You’ll be asked for user name (pi) and password later. The default password for “pi” is “raspberry”.
3. Setup remote desktop
a.) Enable SSH on Raspberry Pi. It is enabled by default but check it out. You are likely familiar with Terminal and linux environment from your Mac. Open RPi’s own Terminal and run:
Navigate to Advanced options -> SSH, hit Enter and select Enable if it’s not selected.
b.) Install XRDP on Raspberry Pi. RDP is a proprietary protocol developed by Microsoft. Do not worry. There is an RDP protocol for Linux:
$ sudo apt-get install xrdp
Above commands update the OS and install the latest xrdp server. It doesn’t require further configuration and works out-of-the-box.
You probably want to run Java applications. In recent build of Raspbian, an Oracle Java runtime environment is pre-installed. Confirm Java installation by checking the Java VM version and build. From the Terminal, execute the following commands:
Install the latest Java when missing. Java 8:
c.) Assign ip addresses to network interfaces. The best way to make sure Raspberry Pi will always have an ip address that we know is to assign an ip address to its Lan and/or WiFi interface.
Guide: How to assign ip address to Raspberry Pi?
d.) Download Microsoft Remote Desktop from Apple’s AppStore to your Mac. Install it.
Mac AppStore – Microsoft Remote Desktop
You can use other rdp client tools like sourceforge.net – Cord
e.) Setup Remote Desktop Connection on your Mac
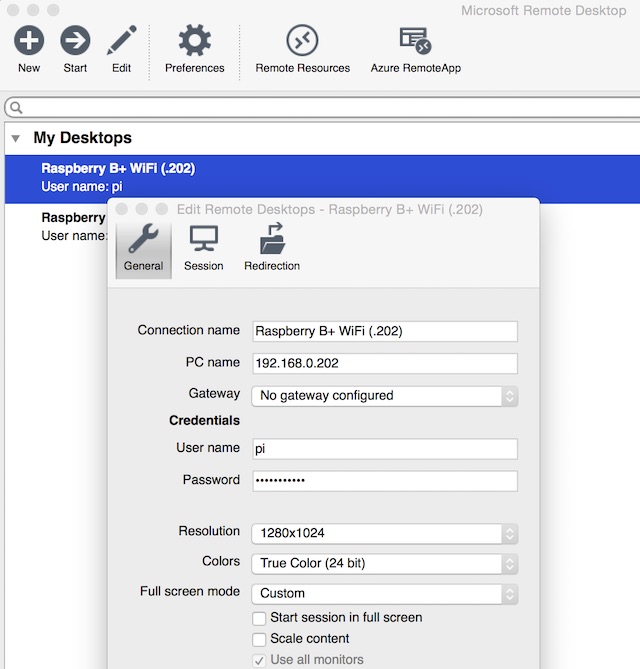
Open the downloaded and installed Microsoft Remote Desktop app. Click on the + toolbar icon or select File -> New from the menu. In the dialog box type in a connection name, the IP address of the Raspberry Pi, the user name (for example: pi) and password, and select a screen resolution (like 1280×1024). Close the form. Open the newly created connection.
f.) Setup FTP connection to RPi on your Mac
Sometimes we want to transfer files and applications to the device manually. The SSH File Transfer Protocol provides file access, file transfer, and file management functionalities over SSH. We have already enabled SSH, so turn to your Mac and configure an FTP client application. For example:
– Use FileZilla. Create new connection: Site Manager -> New site
– Set Host address (RPi ip), Port number (22), Protocol: SFTP – SSH, Logon type: Normal, User: pi, Password: your pi password. That’s it.
4. Configure a developer tool on Mac
Our recommended tool is NetBeans 8+ or Eclipse Juno+ to develop and deploy applications, and test codes from your Mac while running in debug mode on the Raspberry Pi. We have not found a good Xcode solution so far.
User’s guide: How to test and deploy NetBeans c, c++, java… projects?
Excellent installation guides are available on the Internet:
Using NetBeans or Eclipse with the Raspberry Pi Board
NetBeans Java programming for Raspberry
Java FX application development for Raspberry Pi
5. Programming languages
Our personal preference for Raspberry Pi projects is C++ and Java with NetBeans. An example on working configuration:
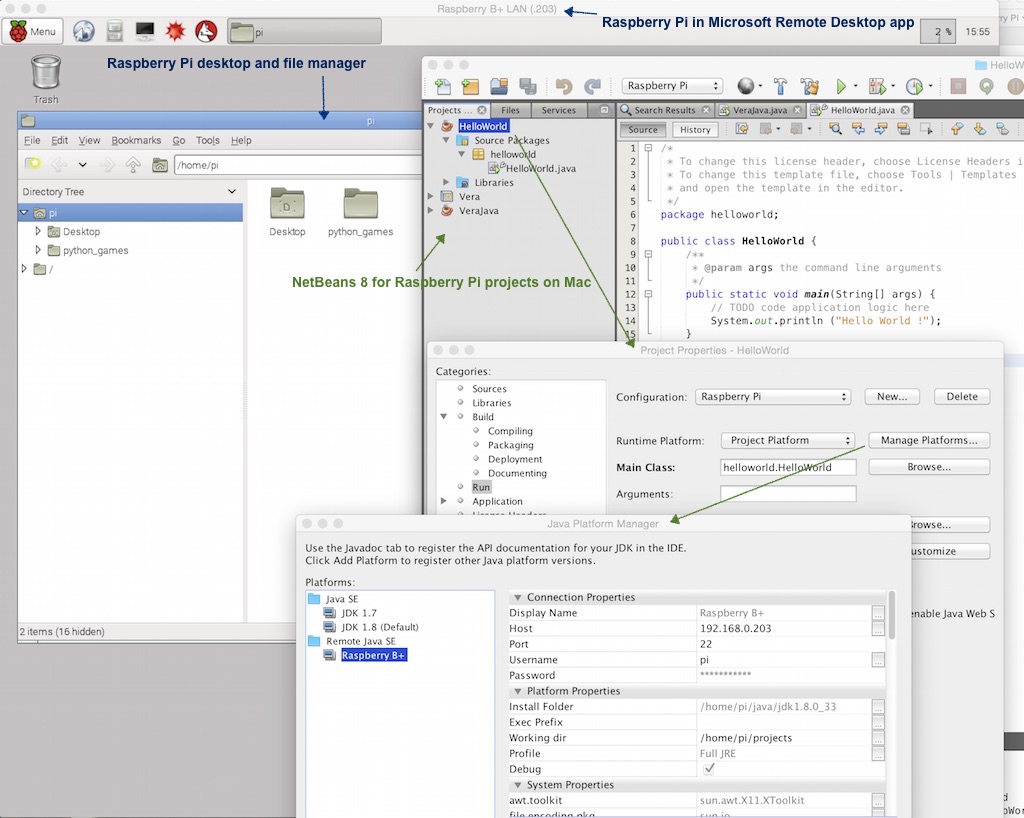
Click on the images to pop up a larger view.
Answers on questions and notes:
– The primary audiences for Rasberry Pi are the students, do-it-yourself geeks and developers. For novice users the Raspberry Pi is rather complex. At least basic programming and additional knowledge of electronics is required. It’s not a cheap home control or media center consumer product.
– Developing Raspberry projects with Xcode on OS X machine: Apple hasn’t shipped Xcode with Java project templates for a long time. Eclipse and NetBeans have better support for Java than Xcode does. Theres is also no good news for c and c++ projects. You are good to go if you want to use Xcode to edit your projects. It doesn’t help with compiling though. Install an Ubuntu/Linux virtual machine running inside Parallels or VMWare and run your favorite IDE there.